Sunday, November 26, 2006
Open During Construction
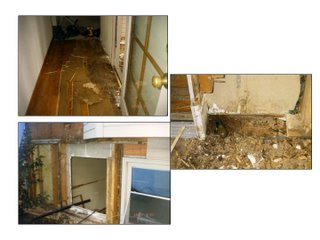
This is the weekend. The weekend 6 months overdue. The weekend we FINALLY got started on the kitchen floor. You see, before we even moved into this house we lost the flooring in our back hallway due to dryrot. It was really pretty hardwood floor - the same as most of the flooring on our main level. But the insipid dryrot of the exterior seeped under the threshold of the back door and rotted out part of the subfloor in front of the door to our backyard, and even rotted out some of the hardwood flooring - from the bottom up. Sure, we noticed a little discoloration in front of the door, but presumed it was normal due to people/animals coming in with wet feet, etc. over the years. We were wrong. Oh so wrong. The entire back hallway had to be ripped up down to the subfloor to fix the rot, and we've been living with the hallway like that ever since. (note the top picture - it's of the hallway that has since been stripped of the hardwood floor down to the subfloor. The other two pictures are of rotted areas found elsewhere.)
 We quickly came up with a plan. We decided we would put pretty tile flooring in that space rather than try to replace the hardwood and try to get it to match the rest of the hardwood. Which would have been costly and tricky. But tile would be good from a durability point of view since that hallway is the main coming and going point to the backyard. Plus, we could then also do the kitchen in the tile and get rid of the old linoleum in the kitchen (the hallway connects the kitchen to the stairs to the master bedroom). The tile we found was a do-it-yourself'er dream AND on clearance. So we bought it. Nearly 7 months ago. It's been stacked in my living room ever since (it's pulling double duty as a not-so-attractive end table in the corner. I almost don't notice it anymore.)
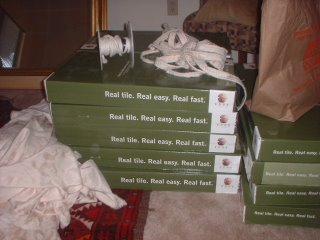
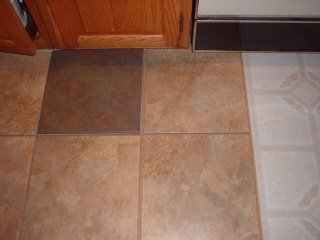
Here is the tile we purchased. We went with the lighter color - ignore the darker tile in the middle. We rejected that in favor of the lighter option.
So on Friday, the day following a lovely and delicious Thanksgiving feast, we got started on the demolition part. What an incredible mess! Mr. Chick took up the linoleum only to discover another layer of even older linoleum underneath (a faux brick style). He tried to get that off, but realized it wasn't necessary and it would come up with the underlayment. We needed to even get rid of the chip-board underlayment and go all the way down to the subfloor, like what is in the connecting hallway (for lots of reasons, but mostly because we feared further dry rot damage and the depth of the chip board underlayment was too thick to accommodate the tiles. They would sit too high where they meet up with the other flooring) But that chip-board crap wasn't coming up easily. It shredded with every attempt to pry it up. Our kitchen is a decent size, so there was a LOT of this to get up. Mr. Chick spent an entire day with a huge pry bar tool repeatedly thrusting, banging, jamming, pulling, cursing, and forcing that underlayment up. My job was keeping up with the clean-up element. We had to use a circular saw to cut into the floor and create smaller sections, supposedly easier to work with. Dust was/is everywhere. The underlayment came up in such small pieces. Seriously. Most of that floor came up in pieces that would fit in the palm of your hand. A big piece was one about the size of a piece of paper. We celebrated those. Those felt like progress.
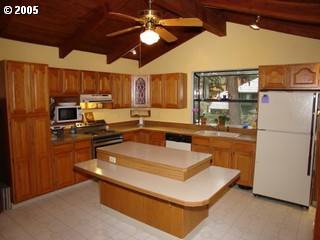
A picture of our kitchen, right before we moved in. You can see it's a large-ish kitchen - lots of floor space (it goes back another 5 feet or so beyond the pantry on the left side - room for a desk - before you reach the edge and move into the dining/family room area and hardwood floor. The hallway in question extends off the right side (not seen in picture). The ugly ceiling fan will ultimately be replaced with drop pendant lights, we'll install knobs on the cabinets to dress them up a bit, and the walls will be painted a light sagey green to coordinate better with the tile floor.
We discovered that the cabinetry and island were installed on top of this chip board underlayment. So we have to remove it up to the edges and then try to get as close as we can in order to fit the new underlayment along the edges as tightly and level as possible. This is not easy. We don't want to damage the cabinetry. We also have to tackle a leveling issue. Our house has some slope-y areas where it settled over the years. Nothing major, but it's there. And with the tile we purchased (2 tiles pre-mounted on a board that fits tongue-in-groove with the next board) you must be perfectly level or you risk the tiles cracking. Oh yes, this is a FUN project.
So that's where things stand as of today: kitchen down to subfloor, a few rough edges along the cabinets to be dealt with, and having to figure out the best way to level the floor. Mr. Chick has done some reasearch and it seems we likely need to use this self-leveling mixture that we'll spread on the floor, but he's consulting with his buddy who works in flooring to confirm before taking the next step. So for the next week or so, my refridgerator sits in the hallway, blocking all passage and forcing us to go around, there are large sheets of chip board stacked in my dining area, buckets of debris in the kitchen and a huge pile of the large chunks in my garage, old linoleum heaped on my deck, and dust everywhere. The house feels very dirty and chaotic. We're trying to keep the kids out of the kitchen as much as possible, but that's not easy.
Aren't all DIY projects like this? You think it will be fairly simple and straightforward and can be done in a long weekend, but once you start you run into snags that delay and prolong everything. That's certainly the situation with this floor. One headache after another.
And did I mention? With the recent wind and rainstorms we've discovered that the area in the hallway in front of the door is still getting wet. The worthless contractor that we fired, but who fixed the rot (or so we thought...) didn't fix the cause of the rot in the first place. Water is still getting through under the threshold of that french door, and we're not sure why. Will a simple storm door fix the problem? Is it something bigger? Is the deck the cause? Who knows. But had we installed the floor immediately we wouldn't know that the problem still exists. So that's the silver lining.
Living through a remodel - even a minor one like this - sucks. The results afterwards will make it all worth it, but enduring the process is not fun. I'm not looking forward to renovating the upstairs bathroom at some point in the next year or so. DIY my ass!
 We quickly came up with a plan. We decided we would put pretty tile flooring in that space rather than try to replace the hardwood and try to get it to match the rest of the hardwood. Which would have been costly and tricky. But tile would be good from a durability point of view since that hallway is the main coming and going point to the backyard. Plus, we could then also do the kitchen in the tile and get rid of the old linoleum in the kitchen (the hallway connects the kitchen to the stairs to the master bedroom). The tile we found was a do-it-yourself'er dream AND on clearance. So we bought it. Nearly 7 months ago. It's been stacked in my living room ever since (it's pulling double duty as a not-so-attractive end table in the corner. I almost don't notice it anymore.)
Here is the tile we purchased. We went with the lighter color - ignore the darker tile in the middle. We rejected that in favor of the lighter option.

So on Friday, the day following a lovely and delicious Thanksgiving feast, we got started on the demolition part. What an incredible mess! Mr. Chick took up the linoleum only to discover another layer of even older linoleum underneath (a faux brick style). He tried to get that off, but realized it wasn't necessary and it would come up with the underlayment. We needed to even get rid of the chip-board underlayment and go all the way down to the subfloor, like what is in the connecting hallway (for lots of reasons, but mostly because we feared further dry rot damage and the depth of the chip board underlayment was too thick to accommodate the tiles. They would sit too high where they meet up with the other flooring) But that chip-board crap wasn't coming up easily. It shredded with every attempt to pry it up. Our kitchen is a decent size, so there was a LOT of this to get up. Mr. Chick spent an entire day with a huge pry bar tool repeatedly thrusting, banging, jamming, pulling, cursing, and forcing that underlayment up. My job was keeping up with the clean-up element. We had to use a circular saw to cut into the floor and create smaller sections, supposedly easier to work with. Dust was/is everywhere. The underlayment came up in such small pieces. Seriously. Most of that floor came up in pieces that would fit in the palm of your hand. A big piece was one about the size of a piece of paper. We celebrated those. Those felt like progress.
A picture of our kitchen, right before we moved in. You can see it's a large-ish kitchen - lots of floor space (it goes back another 5 feet or so beyond the pantry on the left side - room for a desk - before you reach the edge and move into the dining/family room area and hardwood floor. The hallway in question extends off the right side (not seen in picture). The ugly ceiling fan will ultimately be replaced with drop pendant lights, we'll install knobs on the cabinets to dress them up a bit, and the walls will be painted a light sagey green to coordinate better with the tile floor.

We discovered that the cabinetry and island were installed on top of this chip board underlayment. So we have to remove it up to the edges and then try to get as close as we can in order to fit the new underlayment along the edges as tightly and level as possible. This is not easy. We don't want to damage the cabinetry. We also have to tackle a leveling issue. Our house has some slope-y areas where it settled over the years. Nothing major, but it's there. And with the tile we purchased (2 tiles pre-mounted on a board that fits tongue-in-groove with the next board) you must be perfectly level or you risk the tiles cracking. Oh yes, this is a FUN project.
So that's where things stand as of today: kitchen down to subfloor, a few rough edges along the cabinets to be dealt with, and having to figure out the best way to level the floor. Mr. Chick has done some reasearch and it seems we likely need to use this self-leveling mixture that we'll spread on the floor, but he's consulting with his buddy who works in flooring to confirm before taking the next step. So for the next week or so, my refridgerator sits in the hallway, blocking all passage and forcing us to go around, there are large sheets of chip board stacked in my dining area, buckets of debris in the kitchen and a huge pile of the large chunks in my garage, old linoleum heaped on my deck, and dust everywhere. The house feels very dirty and chaotic. We're trying to keep the kids out of the kitchen as much as possible, but that's not easy.
Aren't all DIY projects like this? You think it will be fairly simple and straightforward and can be done in a long weekend, but once you start you run into snags that delay and prolong everything. That's certainly the situation with this floor. One headache after another.
And did I mention? With the recent wind and rainstorms we've discovered that the area in the hallway in front of the door is still getting wet. The worthless contractor that we fired, but who fixed the rot (or so we thought...) didn't fix the cause of the rot in the first place. Water is still getting through under the threshold of that french door, and we're not sure why. Will a simple storm door fix the problem? Is it something bigger? Is the deck the cause? Who knows. But had we installed the floor immediately we wouldn't know that the problem still exists. So that's the silver lining.
Living through a remodel - even a minor one like this - sucks. The results afterwards will make it all worth it, but enduring the process is not fun. I'm not looking forward to renovating the upstairs bathroom at some point in the next year or so. DIY my ass!
// posted by MP @ 10:11 AM 
Comments:
<< Home
I do not know when your home was built, but you do need to be very careful about demolition, esp., with young children in the house.
Old flooring (before 1988) often contained asbestos, and pulling it up can release the fibers into the air.
If there is any demolition to the walls, you should also know whether there is lead in your paint, likely if older than 1973.
Sincerely, Deb E.Downie
Old flooring (before 1988) often contained asbestos, and pulling it up can release the fibers into the air.
If there is any demolition to the walls, you should also know whether there is lead in your paint, likely if older than 1973.
Sincerely, Deb E.Downie
# posted by  : 1:06 PM
: 1:06 PM 
Oooh, I do hope you share the "after" pictures! Sorry the DIY project has to be so difficult (isn't that always the case?). Here's hoping it goes as smoothly as possible (and no more rot or surprises)!
Renee
Post a Comment
Renee
# posted by : 11:07 AM
: 11:07 AM << Home
Hit Counters
![]()

