Monday, October 03, 2005
Designed by MP!
First things first: our weekend at my parents lake cabin was fun. Lots of work and projects, but fun. Mr. Chick was the only one (other than my sisters dog) brave enough to go for a quick swim in the cold-ass lake. Brrr! Mr. Chick took the kids out on the paddle boat and got to see some beautiful spawning salmon. The house got mom-cleaned (now it's clean to her standards), ugly wallpaper border got ripped down, furniture rearranged and evaluated (all the living room stuff goes - ick), and new flooring selected. Linens got sorted, new mattress pads and pillows put in place, and cupboards lined. The roof got power washed and is now moss-free and will last another year or two before needing replacement. New gutters were installed. The antenna got hooked up so we can (sort of) watch TV beyond the DVD or VHS movies we brought (poor Mr. Chick had to shimmy under the house (no foundation) to get this job done. Nasty!). Prioritizing happened for next projects. And oh yeah, the place got good and christened last night (twice!) after my family left and it was just us up there for a night (the kids were asleep)! I have a new fondness for Lake Merwin.
Now onto other things.
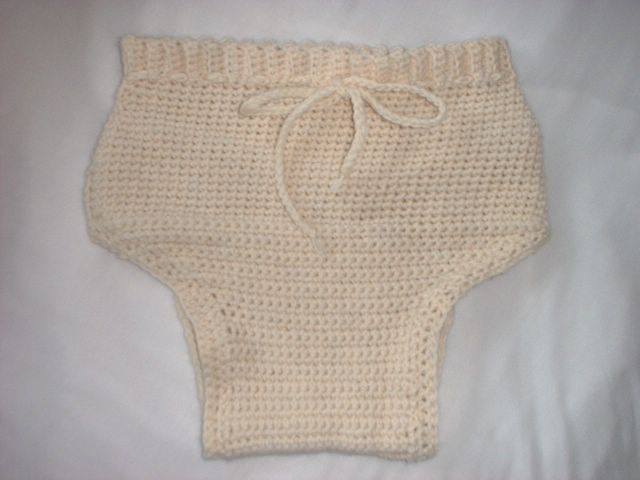
As you may know, I've been making some wool diaper covers/soakers for Lauren. Scroll down a few posts to see pics of a wrap-style cover I made from a free pattern I got from the internet. I added the Velcro and it's in rotation and working well. Lauren looks like she has the biggest butt ever now that she's back in cloth during the day! 2T clothes were NOT designed to accommodate the added bulk of cloth, it seems. Oh well - we're getting by. I also made a pull-on soaker from a pattern I got from my local yarn store - very old school. No kidding, it was from the first part of the 20th century. I followed the pattern perfectly, but it ended up being too big for her and required some unattractive alterations to make it work. It works, but not well under clothes. At all. So I improvised and decided to design my own damn diaper cover. Finding covers for crochet has been very difficult - there simply aren't many patterns out there (for free - let me clarify). So I took the bull by the horns and designed by own:
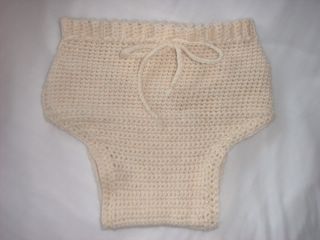
And just because I've had such a hard time finding patterns, I kept notes of what I did to make this soaker and will share them with the world. So if you are interested in crocheting a wool soaker and like the way this one looks, here is the pattern:
WOOL DIAPER COVER/SOAKER PATTERN:
Materials:
1 skein 100% wool yarn. I used Red Heart (?) Fisherman Wool.
Size F/5 - 3.75 crochet hook
*I did not measure gauge specifically and the instructions are for the size I made, which fits my 2T clothes-wearing daughter, who weighs approx. 31 pounds.*
Ch 6
Sc in 2nd ch from hook and in each st to end, work into back loops only. 5 sc. Turn.
Repeat until approx. 20 inches long (or however long it needs to be to fit your child around the waist). After last row, form a ring and connect ends with a sl st in each sc. DO NOT TURN.
Sc along long edge of ribbing (waistband) and connect with a sl st
Lay the waistband flat with the seam at one side. Mark the other side of the waistband, or midway point around the piece.
Rnd 1: Inc. 1 sc at beginning and at the midway point. Join each rnd with a sl st.
Rnd 2-7: Repeat Rnd 1
Rnd 8: Work even
Rnd 9+: Continue to work even until the entire piece, including waistband, measures approx. 5 inches long.
Sc along front half of piece until the midway point. Turn.
Dec. 1 sc on each end of row for approx. 12 rows. (approx. 2 inches from last round).
Work even for approx. 8 inches (this forms the lower crotch portion)
Inc. 1 sc on each end for approx. 12 rows or until piece matches the front.
Attach the crotch section to the back portion of the last round with sl st's. This will form a slightly raised ridge/edge, but it looks cute along the butt!
Edging:
Sc around each leg opening. Join with a sl st
Rnd 2: Sc around until you reach the point where the crotch portion runs straight (worked even). Dc in each sc for as long as the piece is even (lower crotch portion). When the piece begins to inc, then sc to end. Tie off.
Repeat for 2nd leg opening.
Finishing:
Weave in all ends.
To make the tie, ch approx 36 inches. Sl st along ch if prefer the look (I did not do that on this piece, but it tends to look nicer than a plain chain). Weave the ch in and out along the bottom edge of the ribbed waistband, centering to the middle of the front.
Voila!
So far, this soaker is working out well. It's not overly bulky and looks cute! I was aiming for a trim fit. I have noticed that the cloth diaper tends to want to peek out in the back at her butt, so if I were to make this again I might try to make the back crotch portion a little wider than the front. For now I just have to make sure I tuck the diaper in before putting her pants on over the cover. Good luck to any and all who follow in my footsteps and try to make one for themselves!
Now onto other things.
As you may know, I've been making some wool diaper covers/soakers for Lauren. Scroll down a few posts to see pics of a wrap-style cover I made from a free pattern I got from the internet. I added the Velcro and it's in rotation and working well. Lauren looks like she has the biggest butt ever now that she's back in cloth during the day! 2T clothes were NOT designed to accommodate the added bulk of cloth, it seems. Oh well - we're getting by. I also made a pull-on soaker from a pattern I got from my local yarn store - very old school. No kidding, it was from the first part of the 20th century. I followed the pattern perfectly, but it ended up being too big for her and required some unattractive alterations to make it work. It works, but not well under clothes. At all. So I improvised and decided to design my own damn diaper cover. Finding covers for crochet has been very difficult - there simply aren't many patterns out there (for free - let me clarify). So I took the bull by the horns and designed by own:
And just because I've had such a hard time finding patterns, I kept notes of what I did to make this soaker and will share them with the world. So if you are interested in crocheting a wool soaker and like the way this one looks, here is the pattern:
WOOL DIAPER COVER/SOAKER PATTERN:
Materials:
1 skein 100% wool yarn. I used Red Heart (?) Fisherman Wool.
Size F/5 - 3.75 crochet hook
*I did not measure gauge specifically and the instructions are for the size I made, which fits my 2T clothes-wearing daughter, who weighs approx. 31 pounds.*
Ch 6
Sc in 2nd ch from hook and in each st to end, work into back loops only. 5 sc. Turn.
Repeat until approx. 20 inches long (or however long it needs to be to fit your child around the waist). After last row, form a ring and connect ends with a sl st in each sc. DO NOT TURN.
Sc along long edge of ribbing (waistband) and connect with a sl st
Lay the waistband flat with the seam at one side. Mark the other side of the waistband, or midway point around the piece.
Rnd 1: Inc. 1 sc at beginning and at the midway point. Join each rnd with a sl st.
Rnd 2-7: Repeat Rnd 1
Rnd 8: Work even
Rnd 9+: Continue to work even until the entire piece, including waistband, measures approx. 5 inches long.
Sc along front half of piece until the midway point. Turn.
Dec. 1 sc on each end of row for approx. 12 rows. (approx. 2 inches from last round).
Work even for approx. 8 inches (this forms the lower crotch portion)
Inc. 1 sc on each end for approx. 12 rows or until piece matches the front.
Attach the crotch section to the back portion of the last round with sl st's. This will form a slightly raised ridge/edge, but it looks cute along the butt!
Edging:
Sc around each leg opening. Join with a sl st
Rnd 2: Sc around until you reach the point where the crotch portion runs straight (worked even). Dc in each sc for as long as the piece is even (lower crotch portion). When the piece begins to inc, then sc to end. Tie off.
Repeat for 2nd leg opening.
Finishing:
Weave in all ends.
To make the tie, ch approx 36 inches. Sl st along ch if prefer the look (I did not do that on this piece, but it tends to look nicer than a plain chain). Weave the ch in and out along the bottom edge of the ribbed waistband, centering to the middle of the front.
Voila!
So far, this soaker is working out well. It's not overly bulky and looks cute! I was aiming for a trim fit. I have noticed that the cloth diaper tends to want to peek out in the back at her butt, so if I were to make this again I might try to make the back crotch portion a little wider than the front. For now I just have to make sure I tuck the diaper in before putting her pants on over the cover. Good luck to any and all who follow in my footsteps and try to make one for themselves!
// posted by MP @ 1:49 PM 

Hit Counters
![]()

